
本文将利用 GitHub Pages 服务 30 分钟内建立一个 Nikola 静态博客,静态页面的更新、维护等则交由 TravisCI 服务完成,最终效果如本博客所示。文章主要 参考来源在此 ,将只涉及搭建步骤,要求读者对命令行操作有一定了解。
Nikola Internals
When trying to guide someone into adding a feature in Nikola, it hit me that while the way it's structured makes sense to me it is far from obvious.
So, this is a short document explaining what each piece of Nikola does and how it all fits together.
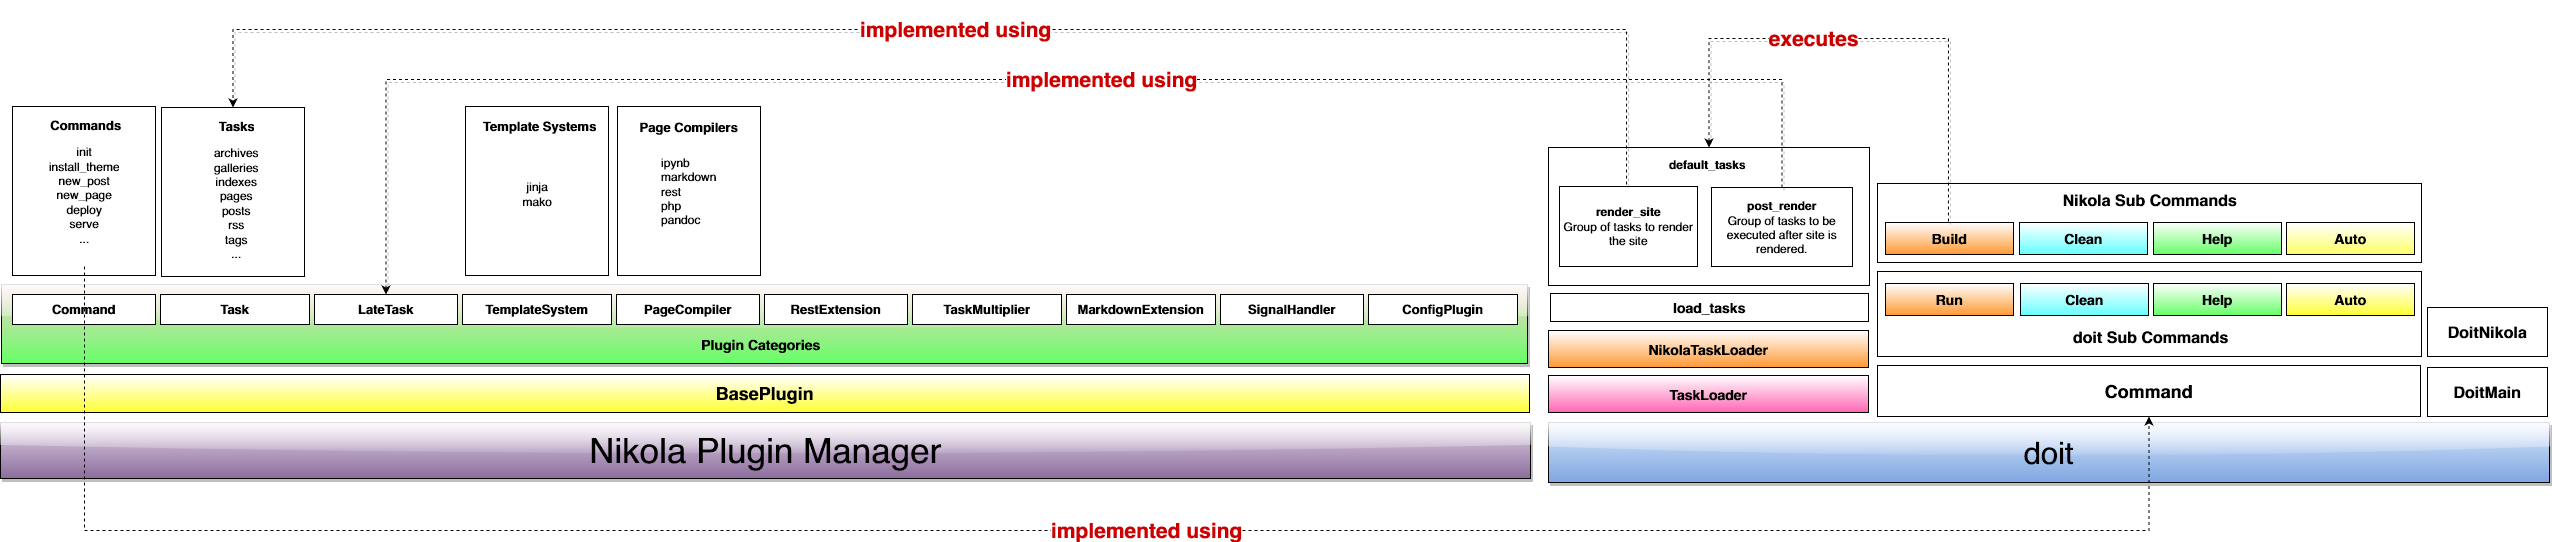
- Nikola is a Pile of Plugins
-
Most of Nikola is implemented as plugins using Yapsy. You can ignore that they are plugins and just think of them as regular python modules and packages with a funny little
.pluginfile next to them.So, 90% of the time, what you want to do is either write a new plugin or extend an existing one.
There are several kinds of plugins, all implementing interfaces defined in
nikola/plugin_categories.pyand documented in Extending NikolaIf your plugin has a dependency, please make sure it doesn't make Nikola throw an exception when the dependency is missing. Try to fail gracefully with an informative message.
- Commands are plugins
-
When you use
nikola fooyou are using the plugincommand/foo. Those are used to extend Nikola's command line. Their interface is defined in theCommandclass. They take options and arguments and do whatever you want, so go wild. - The
buildcommand is special -
The
buildcommand triggers a whole lot of things, and is the core of Nikola because it's the one that you use to build sites. So it deserves its own section.
The Build Command
Nikola's goal is similar, deep at heart, to a Makefile. Take sources, compile them into something, in this case a website. Instead of a Makefile, Nikola uses doit
Doit has the concept of "tasks". The 1 minute summary of tasks is that they have:
- actions
-
What the task does. For example, convert a markdown document into HTML.
- dependencies
-
If this file changes, then we need to redo the actions. If this configuration option changes, redo it, etc.
- targets
-
Files that the action generates. No two actions can have the same targets.
- basename:name
-
Each task is identified by either a name or a basename:name pair.
So, what Nikola does, when you use the build command, is to read the
configuration conf.py from the current folder, instantiate
the Nikola class, and have it generate a whole list of tasks for doit
to process. Then doit will decide which tasks need doing, and do them, in
the right order.
The place where the tasks are generated is in Nikola.gen_tasks, which collects tasks
from all the plugins inheriting BaseTask, massages them a bit, then passes them
to doit.
So, if you want things to happen on build you want to create a Task plugin, or extend
one of the existing ones.
Posts and Pages
Nikola has a concept of posts and pages. Both are more or less the same thing, except
posts are added into RSS feeds and pages are not. All of them are in a list called
"the timeline" formed by objects of class Post.
When you are creating a task that needs the list of posts and/or pages (for example,
the RSS creation plugin) on task execution time, your plugin should call self.site.scan_posts()
in gen_tasks to ensure the timeline is created and available in
self.site.timeline. You should not modify the timeline, because it will cause consistency issues.
Your plugin can use the timeline to generate "stuff" (technical term). For example, Nikola comes with plugins that use the timeline to create a website (surprised?).
The workflow included with nikola is as follows (incomplete!):
The post is assigned a compiler based on its extension and the
COMPILERSoption.The compiler is applied to the post data and a "HTML fragment" is produced. That fragment is stored in a cache (the
postsplugin).The configured theme has templates (and a template engine), which are applied to the post's HTML fragment and metadata (the
pagesplugin).The original sources for the post are copied to some accessible place (the
sourcesplugin).If the post is tagged, some pages and RSS feeds for each tag are updated (the
tagsplugin).If the post is new, it's included in the blog's RSS feed (the
rssplugin).The post is added in the right place in the index pages for the blog (the
indexesplugin).CSS/JS/Images for the theme are put in the right places (the
copy_assetsandbundlesplugins).A File describing the whole site is created (the
sitemapplugin).
You can add whatever you want to that list: just create a plugin for it.
You can also expand Nikola's capabilities at several points:
- compilers
-
Nikola supports a variety of markups. If you want to add another one, you need to create a
Compilerplugin. - templates
-
Nikola's themes can use Jinja2 or Mako templates. If you prefer another template system, you have to create a
TemplateSystemplugin. - themes
-
To change how the generated site looks, you can create custom themes.
And of course, you can also replace or extend each of the existing plugins.
Nikola Architecture
In [73]:
%matplotlib inline
In [74]:
from pylab import *
import matplotlib
import matplotlib.pyplot as plt
import numpy as np
In addition to the regular plot method, there are a number of other functions for generating different kind of plots. See the matplotlib plot gallery for a complete list of available plot types: http://matplotlib.org/gallery.html. Some of the more useful ones are show below:
In [75]:
n = np.array([0,1,2,3,4,5])
In [76]:
fig, axes = plt.subplots(1, 4, figsize=(12,3))

axes[0].scatter(xx, xx + 0.25*np.random.randn(len(xx)))
axes[0].set_title("scatter")

axes[1].step(n, n**2, lw=2)
axes[1].set_title("step")

axes[2].bar(n, n**2, align="center", width=0.5, alpha=0.5)
axes[2].set_title("bar")

axes[3].fill_between(x, x**2, x**3, color="green", alpha=0.5);
axes[3].set_title("fill_between");

In [77]:
from mpl_toolkits.mplot3d.axes3d import Axes3D
In [78]:
fig = plt.figure(figsize=(14,6))

# `ax` is a 3D-aware axis instance because of the projection='3d' keyword argument to add_subplot
ax = fig.add_subplot(1, 2, 1, projection='3d')

p = ax.plot_surface(X, Y, Z, rstride=4, cstride=4, linewidth=0)

# surface_plot with color grading and color bar
ax = fig.add_subplot(1, 2, 2, projection='3d')
p = ax.plot_surface(X, Y, Z, rstride=1, cstride=1, cmap=matplotlib.cm.coolwarm, linewidth=0, antialiased=False)
cb = fig.colorbar(p, shrink=0.5)
